TensorFlow-简单应用案例
更新时间
浏览
TIP
本文主要是介绍 TensorFlow-简单应用案例 。
# TensorFlow2.X结合OpenCV 实现手势识别功能
这篇文章主要介绍了TensorFlow2.X结合OpenCV 实现手势识别功能,本文通过实例代码给大家介绍的非常详细,对大家的学习或工作具有一定的参考借鉴价值,需要的朋友可以参考下
使用Tensorflow 构建卷积神经网络,训练手势识别模型,使用opencv DNN 模块加载模型实时手势识别
效果如下:

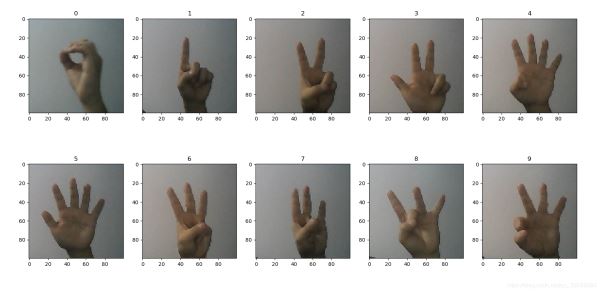
先显示下部分数据集图片(0到9的表示,感觉很怪)

# 构建模型进行训练
import tensorflow as tf
from tensorflow import keras
from tensorflow.keras import datasets,layers,optimizers,Sequential,metrics
from tensorflow.python.framework.convert_to_constants import convert_variables_to_constants_v2
import os
import pathlib
import random
import matplotlib.pyplot as plt
os.environ['TF_CPP_MIN_LOG_LEVEL']='2'
def read_data(path):
 path_root = pathlib.Path(path)
 # print(path_root)
 # for item in path_root.iterdir():
 #  print(item)
 image_paths = list(path_root.glob('*/*'))
 image_paths = [str(path) for path in image_paths]
 random.shuffle(image_paths)
 image_count = len(image_paths)
 # print(image_count)
 # print(image_paths[:10])
 label_names = sorted(item.name for item in path_root.glob('*/') if item.is_dir())
 # print(label_names)
 label_name_index = dict((name, index) for index, name in enumerate(label_names))
 # print(label_name_index)
 image_labels = [label_name_index[pathlib.Path(path).parent.name] for path in image_paths]
 # print("First 10 labels indices: ", image_labels[:10])
 return image_paths,image_labels,image_count
def preprocess_image(image):
 image = tf.image.decode_jpeg(image, channels=3)
 image = tf.image.resize(image, [100, 100])
 image /= 255.0 # normalize to [0,1] range
 # image = tf.reshape(image,[100*100*3])
 return image
def load_and_preprocess_image(path,label):
 image = tf.io.read_file(path)
 return preprocess_image(image),label
def creat_dataset(image_paths,image_labels,bitch_size):
 db = tf.data.Dataset.from_tensor_slices((image_paths, image_labels))
 dataset = db.map(load_and_preprocess_image).batch(bitch_size)
 return dataset
def train_model(train_data,test_data):
 #构建模型
 network = keras.Sequential([
   keras.layers.Conv2D(32,kernel_size=[5,5],padding="same",activation=tf.nn.relu),
   keras.layers.MaxPool2D(pool_size=[2, 2], strides=2, padding='same'),
   keras.layers.Conv2D(64,kernel_size=[3,3],padding="same",activation=tf.nn.relu),
   keras.layers.MaxPool2D(pool_size=[2, 2], strides=2, padding='same'),
   keras.layers.Conv2D(64,kernel_size=[3,3],padding="same",activation=tf.nn.relu),
   keras.layers.Flatten(),
   keras.layers.Dense(512,activation='relu'),
   keras.layers.Dropout(0.5),
   keras.layers.Dense(128,activation='relu'),
   keras.layers.Dense(10)])
 network.build(input_shape=(None,100,100,3))
 network.summary()
 network.compile(optimizer=optimizers.SGD(lr=0.001),
   loss=tf.losses.SparseCategoricalCrossentropy(from_logits=True),
   metrics=['accuracy']
 )
 #模型训练
 network.fit(train_data, epochs = 100,validation_data=test_data,validation_freq=2)
 network.evaluate(test_data)
 tf.saved_model.save(network,'D:\\code\\PYTHON\\gesture_recognition\\model\\')
 print("保存模型成功")
 # Convert Keras model to ConcreteFunction
 full_model = tf.function(lambda x: network(x))
 full_model = full_model.get_concrete_function(
 tf.TensorSpec(network.inputs[0].shape, network.inputs[0].dtype))
 # Get frozen ConcreteFunction
 frozen_func = convert_variables_to_constants_v2(full_model)
 frozen_func.graph.as_graph_def()

 layers = [op.name for op in frozen_func.graph.get_operations()]
 print("-" * 50)
 print("Frozen model layers: ")
 for layer in layers:
  print(layer)

 print("-" * 50)
 print("Frozen model inputs: ")
 print(frozen_func.inputs)
 print("Frozen model outputs: ")
 print(frozen_func.outputs)

 # Save frozen graph from frozen ConcreteFunction to hard drive
 tf.io.write_graph(graph_or_graph_def=frozen_func.graph,
   logdir="D:\\code\\PYTHON\\gesture_recognition\\model\\frozen_model\\",
   name="frozen_graph.pb",
   as_text=False)
 print("模型转换完成,训练结束")


if __name__ == "__main__":
 print(tf.__version__)
 train_path = 'D:\\code\\PYTHON\\gesture_recognition\\Dataset'
 test_path = 'D:\\code\\PYTHON\\gesture_recognition\\testdata'
 image_paths,image_labels,_ = read_data(train_path)
 train_data = creat_dataset(image_paths,image_labels,16)
 image_paths,image_labels,_ = read_data(test_path)
 test_data = creat_dataset(image_paths,image_labels,16)
 train_model(train_data,test_data)
# OpenCV加载模型,实时检测
这里为了简化检测使用了ROI。
import cv2
from cv2 import dnn
import numpy as np
print(cv2.__version__)
class_name = ['0', '1', '2', '3', '4', '5', '6', '7', '8', '9']
net = dnn.readNetFromTensorflow('D:\\code\\PYTHON\\gesture_recognition\\model\\frozen_model\\frozen_graph.pb')
cap = cv2.VideoCapture(0)
i = 0
while True:
 _,frame= cap.read()
 src_image = frame
 cv2.rectangle(src_image, (300, 100),(600, 400), (0, 255, 0), 1, 4)
 frame = cv2.cvtColor(frame,cv2.COLOR_BGR2RGB)
 pic = frame[100:400,300:600]
 cv2.imshow("pic1", pic)
 # print(pic.shape)
 pic = cv2.resize(pic,(100,100))
 blob = cv2.dnn.blobFromImage(pic,
        scalefactor=1.0/225.,
        size=(100, 100),
        mean=(0, 0, 0),
        swapRB=False,
        crop=False)
 # blob = np.transpose(blob, (0,2,3,1))
 net.setInput(blob)
 out = net.forward()
 out = out.flatten()

 classId = np.argmax(out)
 # print("classId",classId)
 print("预测结果为:",class_name[classId])
 src_image = cv2.putText(src_image,str(classId),(300,100), cv2.FONT_HERSHEY_SIMPLEX, 2,(0,0,255),2,4)
 # cv.putText(img, text, org, fontFace, fontScale, fontcolor, thickness, lineType)
 cv2.imshow("pic",src_image)
 if cv2.waitKey(10) == ord('0'):
  break
小结
这里本质上还是一个图像分类任务。而且,样本数量较少。优化的时候需要做数据增强,还需要防止过拟合。
到此这篇关于TensorFlow2.X结合OpenCV 实现手势识别功能的文章就介绍到这了,更多相关TensorFlow OpenCV 手势识别内容请搜索脚本之家以前的文章或继续浏览下面的相关文章希望大家以后多多支持脚本之家!
您可能感兴趣的文章:
- opencv实现静态手势识别 opencv实现剪刀石头布游戏 (opens new window)
- OpenCV+python手势识别框架和实例讲解 (opens new window)
- OpenCV+Python3.5 简易手势识别的实现 (opens new window)
# 【----------------------------】
# 基于TensorFlow的2个机器学习简单应用实例
技术标签: TensorFlow (opens new window)
根据数据建立了一个线性模型,并设计了一个损失模型。 在我们的线性模型 y=W×x+b中,不断的改变W和b的值,来找到一个使loss最小的值。使用梯度下降(Gradient Descent)优化算法,通过不断的改变模型中变量的值,来找到最小损失值。
# 1、实例一
#引入TensorFlow模块
import tensorflow as tf

#创建节点保存W和b,并初始化
W = tf.Variable([0.1],  tf.float32)
b = tf.Variable([-0.1], tf.float32)

#定义节点x,保存输入x数据
x = tf.placeholder(tf.float32)

#定义线性模型
linear_model = W * x + b

#定义节点y,保存输入y数据
y = tf.placeholder(tf.float32)

#定义损失函数
loss = tf.reduce_sum(tf.square(linear_model - y))

#初始化
init = tf.global_variables_initializer()

#定义session
sess = tf.Session()

#训练数据
x_train = [1,2,3,6,8]
y_train = [4.8,8.5,10.4,21.0,25.3]

sess.run(init)

#定义优化器
opti = tf.train.GradientDescentOptimizer(0.001)
train = opti.minimize(loss)

#迭代
for i in range(10000):
    sess.run(train, {x:x_train, y:y_train})

#打印结果
print('W:%s  b:%s  loss:%s' %(sess.run(W), sess.run(b), sess.run(loss, {x:x_train, y:y_train})))
结果如下:

# 2、实例二
import tensorflow as tf
import numpy as np
import matplotlib.pyplot as plt

# Prepare train data
train_X = np.linspace(-1, 1, 100)
train_Y = 2 * train_X + np.random.randn(*train_X.shape) * 0.33 + 10

# Define the model
X = tf.placeholder("float")
Y = tf.placeholder("float")
w = tf.Variable(0.0, name="weight")
b = tf.Variable(0.0, name="bias")
loss = tf.square(Y - X*w - b)
train_op = tf.train.GradientDescentOptimizer(0.01).minimize(loss)

# Create session to run
with tf.Session() as sess:
    sess.run(tf.global_variables_initializer())

    epoch = 1
    for i in range(10):
        for (x, y) in zip(train_X, train_Y):
            _, w_value, b_value = sess.run([train_op, w, b],feed_dict={X: x,Y: y})
        print("Epoch: {}, w: {}, b: {}".format(epoch, w_value, b_value))
        epoch += 1


#draw
plt.plot(train_X,train_Y,"+")
plt.plot(train_X,train_X.dot(w_value)+b_value)
plt.show()
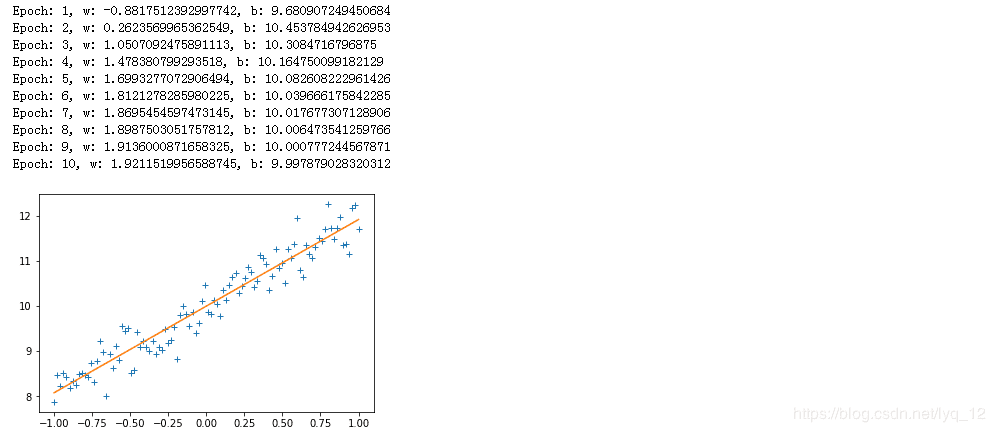
结果如下:

版权声明:本文为博主原创文章,遵循 CC 4.0 BY-SA (opens new window)版权协议,转载请附上原文出处链接和本声明。 本文链接:https://blog.csdn.net/lyq_12/article/details/84935183
# 参考文章
- https://www.jb51.net/article/184315.htm
- https://www.pianshen.com/article/3293138778/


