TIP
本文主要是介绍 Pytorch-基础精华总结 。
- PyTorch学习(1)
- 一、预先善其事,必先利其器-pytorch与cuda对应关系
- 二、pytorch相关
- 【----------------------------】
- PyTorch学习(2)
- 1 Numpy与Torch的区别与联系
- 2 激励函数(Activation Function)
- 3 Regression回归(关系拟合回归)
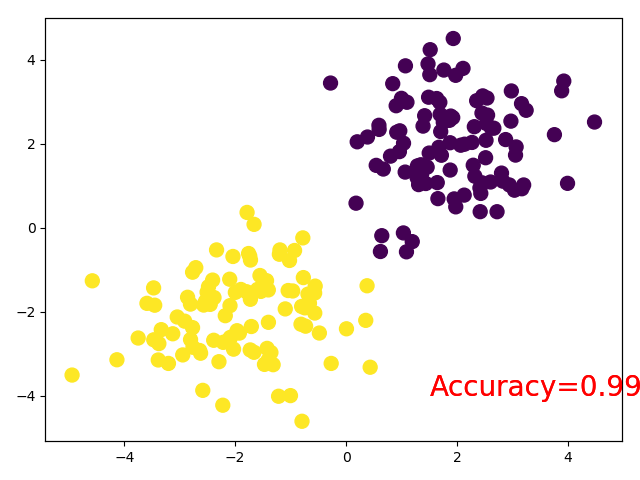
- 4 Classification(分类)
- 5 Torch网络
- 6 神经网络分类
- 【----------------------------】
- PyTorch学习-总结篇(3)——最实用部分
- 一、每个项目代码应该有五个部分(大同小异)
- 二、以一个项目示例来进行讲解(MNIST手写数据集)
- 参考文章
# PyTorch学习(1)
PyTorch学习(1)一、预先善其事,必先利其器-pytorch与cuda对应关系二、pytorch相关1.创建张量2.维度变换3.索引切片及数学运算4.autograd:自动求导
# 一、预先善其事,必先利其器-pytorch与cuda对应关系
| pytorch | torchvision | python | cuda |
|---|---|---|---|
| <1.0.1 | 0.2.2 | ==2.7,>=3.5,<=3.7 | 9.0,10.0 |
| 1.1.0 | 0.3.0 | ==2.7,>=3.5,<=3.7 | 9.0,10.0 |
| 1.2.0 | 0.4.0 | ==2.7,>=3.5,<=3.7 | 9.2,10.0 |
| 1.3.0 | 0.4.1 | ==2.7,>=3.5,<=3.7 | 9.2,10.0 |
| 1.3.1 | 0.4.2 | ==2.7,>=3.5,<=3.7 | 9.2,10.0 |
| 1.4.0 | 0.5.0 | ==2.7,>=3.5,<=3.8 | 9.2,10.0 |
| 1.5.0 | 0.6.0 | >=3.6 | 9.2,10.1,10.2 |
| 1.5.1 | 0.6.1 | >=3.6 | 9.2,10.1,10.2 |
各个版本最好相对应,不然代码的运行容易出现问题。
# 二、pytorch相关
# 1.创建张量
import torch


a1 = torch.tensor(3)
a2 = torch.tensor([1, 2, 3])
a3 = torch.randn(2, 3)
b3 = torch.rand(2, 3)
a4 = torch.rand(1, 2, 3)

print('a1的值:', a1)
print('a1的大小:', a1.shape)
print('------------')
print('a2的值:', a2)
print('a2的大小:', a2.shape)
print('------------')
print('a3的值:', a3)
print('a3的大小:', a3.shape)
print('------------')
print('b3的值:', b3)
print('b3的大小:', b3.shape)
print('------------')
print('a4的值:', a4)
print('a4的大小:', a4.shape)
print('\n 以上为分步定义tensor的值 \n *******************')

# 结果显示
a1的值: tensor(3)
a1的大小: torch.Size([])
------------
a2的值: tensor([1, 2, 3])
a2的大小: torch.Size([3])
------------
a3的值: tensor([[ 0.8593,  0.8400, -0.7855],
      [-0.6212, -0.2771, -0.9999]])
a3的大小: torch.Size([2, 3])
------------
b3的值: tensor([[0.0023, 0.1359, 0.0431],
      [0.9841, 0.4317, 0.2710]])
b3的大小: torch.Size([2, 3])
------------
a4的值: tensor([[[0.3898, 0.1011, 0.8075],
        [0.4289, 0.2972, 0.8072]]])
a4的大小: torch.Size([1, 2, 3])

以上为分步定义tensor的值
*******************


print(torch.tensor([1, 2.2, -1]))
print('定义的确定数据的float张量:', torch.FloatTensor([1, 2.2, -1]))
print(torch.tensor([[1, 2.2],[3, -1]]))  # 与rand的操作类似,构建多维张量
print('\n 以上为直接定义tensor的值 \n *******************')

#结果显示
tensor([ 1.0000,  2.2000, -1.0000])
定义的确定数据的float张量: tensor([ 1.0000,  2.2000, -1.0000])
tensor([[ 1.0000,  2.2000],
      [ 3.0000, -1.0000]])

以上为直接定义tensor的值
*******************


print(torch.empty(2, 4))  # 定义未初始化的2行4列的张量
print('定义的1行3列的随机float张量:', torch.FloatTensor(1, 3))
print('\n 以上为随机(未初始化)定义tensor的值 \n *******************')

#结果显示
tensor([[1.9758e-43, 0.0000e+00, 0.0000e+00, 0.0000e+00],
      [0.0000e+00, 0.0000e+00, 0.0000e+00, 0.0000e+00]])
定义的1行3列的随机float张量: tensor([[0.0000e+00, 0.0000e+00, 5.3564e-18]])

以上为随机(未初始化)定义tensor的值
*******************


print('a1原来的类型:', a1.type())
torch.set_default_tensor_type(torch.DoubleTensor)
print('a1转变后的类型:', a1.type())
print('\n 以上为转换默认张量类型 \n *******************')

#结果显示
a1原来的类型: torch.LongTensor
a1转变后的类型: torch.LongTensor

以上为转换默认张量类型
*******************


a5 = torch.rand(3)
b5 = torch.randperm(3)  # 生成随机的整数张量
print('a5的值:', a5)
print('b5的值:', b5)
print('将b5作为a5的索引的值:', a5[b5])
print('\n 以上为生成随机的整数张量 \n *******************')

#结果显示
a5的值: tensor([0.5683, 0.6638, 0.6250])
b5的值: tensor([1, 0, 2])
将b5作为a5的索引的值: tensor([0.6638, 0.5683, 0.6250])

以上为生成随机的整数张量
*******************
扩展:所创建张量的其他相关语句
- torch.ones(size)/zero(size)/eye(size): 返回全为1/0/对角单位的张量
- torch.full(size,fill_value): 返回以fill_value取值填充的size大小的张量
- torch.rand(size): 返回[0,1)之间的均匀分布张量
- torch.randn(size): 返回方差为1,均值为0的正态分布张量
- torch.*_like(input): 返回和输入大小(几维、几行几列)一样的张量,其中*可以是rand、randn等等
- torch.linspace(start,end,step=100): 返回以步长为100的由start到end的一维张量
- torch.logspace(start,end,steps=100,base=10.0): 返回以100为步长的由base为底的start次方到end次方的一维张量
# 2.维度变换
先列一个总纲,具体用法可见代码,顺序与总纲一致
- tensor.squeeze()/tensor.unsqueeze(0) 降维/升维
- tensor.expand()/tensor.repeat() 扩展张量
- tensor.transpose()/tensor.premute() 调换张量维度的顺序
- tensor.cat()/tensor.stack() 张量拼接
import torch

x = torch.rand(4, 1, 28, 1, 28, 1)
y1 = x.unsqueeze(0)  # 在对应索引位置插入一个维度
print('y1的大小:', y1.shape)
y2 = x.squeeze()  # 删除维度为1的维度
print('y2的大小:', y2.shape)
y3 = x.squeeze(1)  # 删除括号数值里对应的索引维度的维度为1的维度
print('y3的大小:', y3.shape)

#结果显示
y1的大小: torch.Size([1, 4, 1, 28, 1, 28, 1])
y2的大小: torch.Size([4, 28, 28])
y3的大小: torch.Size([4, 28, 1, 28, 1])


a = torch.tensor([[[1, 2, 3]]])
print(a)
print('a的大小:', a.shape)
b1 = a.expand(1, 2, 3)  # 注意的是expand中的扩展是对某个单一维度(值为1的维度)进行扩展,比如是1行3列,就对行(因为行才是1)进行扩展,列(如果多维,就除要变的不一样,其他必须一样)需要与原数据一致。
print(b1)
print('b1的大小:', b1.shape)
b2 = a.expand(1, -1, 3) # -1表示与原张量维度一致
print(b2)
print('b2的大小:', b2.shape)
c = torch.tensor([[[1, 2, 3]]])
print(c)
d1 = c.repeat(2, 4, 2)  # repeat是将原张量看成一个整体,对其进行复制操作,例中对第三个维度复制两次,即变成两个,行复制四次,列复制两次,可以不用管维度对应,只管扩张。
print(d1)
print('d1的大小:', d1.shape)
d2 = c.repeat(2, 4, 2, 1)  # 此处是增加一个维度,即整体变成两个,然后里面的一个小块是四个,四个块中的一个又是经过原张量行复制两次,列不复制生成。
print(d2)
print('d2的大小:', d2.shape)

#结果显示
tensor([[[1, 2, 3]]])
a的大小: torch.Size([1, 1, 3])
tensor([[[1, 2, 3],
        [1, 2, 3]]])
b1的大小: torch.Size([1, 2, 3])
tensor([[[1, 2, 3]]])
b2的大小: torch.Size([1, 1, 3])

tensor([[[1, 2, 3]]])
tensor([[[1, 2, 3, 1, 2, 3],
        [1, 2, 3, 1, 2, 3],
        [1, 2, 3, 1, 2, 3],
        [1, 2, 3, 1, 2, 3]],

      [[1, 2, 3, 1, 2, 3],
        [1, 2, 3, 1, 2, 3],
        [1, 2, 3, 1, 2, 3],
        [1, 2, 3, 1, 2, 3]]])
d1的大小: torch.Size([2, 4, 6])
tensor([[[[1, 2, 3],
        [1, 2, 3]],

        [[1, 2, 3],
        [1, 2, 3]],

        [[1, 2, 3],
        [1, 2, 3]],

        [[1, 2, 3],
        [1, 2, 3]]],


      [[[1, 2, 3],
        [1, 2, 3]],

        [[1, 2, 3],
        [1, 2, 3]],

        [[1, 2, 3],
        [1, 2, 3]],

        [[1, 2, 3],
        [1, 2, 3]]]])
d2的大小: torch.Size([2, 4, 2, 3])


e = torch.rand(2, 2, 3, 4)
# print(e)
f1 = e.transpose(1, 3)  # 将指定的维度进行调换,换的只能是两个
# print(f1)
print('f1的大小:', f1.shape)
f2 = e.permute(0, 2, 3, 1)  # 将所有维度进行括号内的索引顺序转换,转换的个数必须和原张量一样
# print(f2)
print('f2的大小:', f2.shape)

#结果显示
f1的大小: torch.Size([2, 4, 3, 2])
f2的大小: torch.Size([2, 3, 4, 2])


g1 = torch.randn(3, 4)
g2 = torch.rand(3, 4)
print(g1)
print(g2)
h1 = torch.cat((g1, g2), 0)  # 按行进行同一维度的拼接,如上例,按行拼接拼接后为(6,4)
h2 = torch.stack((g1, g2), 0)  # 沿着一个新的维度对输入张量进行拼接,此处的dim一般为0,不取其他值
print('h1的大小:', h1.shape)
print('h2的大小:', h2.shape)

#结果显示
tensor([[ 0.5554,  0.0449,  0.1231, -0.5494],
      [-0.1639, -0.2909,  2.2580,  1.5841],
      [ 0.1315, -1.4964,  0.0706, -0.9549]])
tensor([[0.9899, 0.5225, 0.7383, 0.9421],
      [0.5493, 0.0317, 0.3085, 0.9770],
      [0.5221, 0.0223, 0.2915, 0.7914]])
h1的大小: torch.Size([6, 4])
h2的大小: torch.Size([2, 3, 4])
# 3.索引切片及数学运算
索引切片:
import torch

a = torch.rand(2, 3, 4, 4)
print(a.shape)

# 索引
print('a的前两个维度的索引:', a[0, 0].shape)
print('a的具体值索引:', a[0, 0, 2, 3])

# 切片
print('a的第一个维度进行切片:', a[:1].shape)
print('a的每个维度进行切片:', a[:-1, :1, :, :].shape)

# ...的用法
print(a[...].shape)
print(a[0, ...].shape)
print(a[:, 2, ...].shape)
print(a[..., :2].shape)

# 掩码取值
x = torch.rand(3, 4)
print(x)
mask = x.ge(0.5)  # 与0.5比较,大的为Ture,小的为False
print(mask)
print(torch.masked_select(x, mask))  # 挑选出里面为True的值并打印

# 通过torch.take取值
y = torch.tensor([[4, 3, 5], [6, 7, 8]])
y1 = torch.take(y, torch.tensor([0, 2, 5]))
print('y的取值:', y)
print('y1的取值:', y1)

#结果显示
torch.Size([2, 3, 4, 4])
# 索引结果
a的前两个维度的索引: torch.Size([4, 4])
a的具体值索引: tensor(0.8660)
# 切片结果
a的第一个维度进行切片: torch.Size([1, 3, 4, 4])
a的每个维度进行切片: torch.Size([1, 1, 4, 4])
# ...的用法结果
torch.Size([2, 3, 4, 4])
torch.Size([3, 4, 4])
torch.Size([2, 4, 4])
torch.Size([2, 3, 4, 2])
# 掩码取值结果
tensor([[0.5534, 0.1831, 0.9449, 0.6261],
      [0.4419, 0.2026, 0.4816, 0.0258],
      [0.7853, 0.9431, 0.7531, 0.2443]])
tensor([[ True, False,  True,  True],
      [False, False, False, False],
      [ True,  True,  True, False]])
tensor([0.5534, 0.9449, 0.6261, 0.7853, 0.9431, 0.7531])
# 通过torch.take取值结果
y的取值: tensor([[4, 3, 5],
      [6, 7, 8]])
y1的取值: tensor([4, 5, 8])
加、减、乘:
- torch.add() 加法
- torch.sub() 减法
- torch.mul/mm/bmm/matmul() 乘法
数学运算:
import torch

#加、减、乘
a = torch.rand(3, 4)
b = torch.rand(4)

c1 = a + b
c2 = torch.add(a, b)
print('直接用加号结果:', c1)
print('使用add结果:', c2)

d1 = a - b
d2 = torch.sub(a, b)
print('直接用减号结果:', d1)
print('使用sub结果:', d2)

c = torch.randn(1, 2, 3)
d = torch.randn(1, 3, 4)
e = torch.rand(1, 2)
f = torch.rand(2, 3)
e1 = a * b
e2 = torch.mul(a, b)  # 点乘,当a,b维度不一样可以自己复制填充不够的然后相乘,对位相乘
e3 = torch.mm(e, f)   # 针对二维矩阵,要满足矩阵乘法规则
e4 = torch.bmm(c, d)  # 输入,即括号内的张量必须是三维的,且满足第一个(x,y,z),第二个必须(x,z,随意)
e5 = torch.matmul(c, d)  # 具有广播效果,矩阵维度不一样时,自动填充,然后相乘,但需要相乘矩阵最后两个维度满足矩阵乘法法则
print(e1)
print(e2)
print(e3)
print(e4)
print(e5)

#结果显示
直接用加号结果: tensor([[0.9060, 1.1983, 1.1655, 1.2972],
      [1.6351, 0.3494, 0.8485, 1.0029],
      [1.8000, 0.4619, 0.9559, 0.7184]])
使用add结果: tensor([[0.9060, 1.1983, 1.1655, 1.2972],
      [1.6351, 0.3494, 0.8485, 1.0029],
      [1.8000, 0.4619, 0.9559, 0.7184]])
直接用减号结果: tensor([[-0.8189,  0.7739,  0.7891,  0.2740],
      [-0.0898, -0.0749,  0.4722, -0.0202],
      [ 0.0752,  0.0375,  0.5796, -0.3047]])
使用sub结果: tensor([[-0.8189,  0.7739,  0.7891,  0.2740],
      [-0.0898, -0.0749,  0.4722, -0.0202],
      [ 0.0752,  0.0375,  0.5796, -0.3047]])

tensor([[0.0376, 0.2092, 0.1839, 0.4019],
      [0.6663, 0.0291, 0.1243, 0.2514],
      [0.8086, 0.0530, 0.1445, 0.1058]])
tensor([[0.0376, 0.2092, 0.1839, 0.4019],
      [0.6663, 0.0291, 0.1243, 0.2514],
      [0.8086, 0.0530, 0.1445, 0.1058]])
tensor([[0.1087, 0.0323, 0.2181]])
tensor([[[ 1.9481,  3.7797, -2.5594,  0.2444],
        [ 0.3162,  0.1580, -0.0066,  0.0721]]])
tensor([[[ 1.9481,  3.7797, -2.5594,  0.2444],
        [ 0.3162,  0.1580, -0.0066,  0.0721]]])
扩展:
- torch.exp() e的指数幂
- torch.log() 取对数
- torch.mean () 求均值
- torch.sum () 求和
- torch.max\torch.min () 求最大/最小值
- torch.prod () 返回input中所有元素的乘积
- torch.argmin(input)/torch.argmax(input) 最大值/最小值的索引
- torch.where(condition, x, y)) 如果符合条件返回x,不符合返回y
- torch.gather(input, dim, index) 沿dim指定的轴收集数据
- tensor.floor() 向下取整
- tensor.pow() 平方
- tensor.sqrt() 开根号
- tensor.ceil() 向上取整
- tensor.round() 四舍五入
- tensor.trunc() 取整数值
- tensor.frac() 取小数值
- tensor.clamp(min,max) 比最小值小的变成最小值,把比最大值大的变成最大值
# 4.autograd:自动求导
首先,在pytorch中创建张量的形式为:torch.tensor(data= , dtype=None(默认) , device=None(默认) , requires_grad=False(默认) )。简单来说,自动求导就是在进行张量定义时,自行的可以进行求导或者说求梯度计算,只要将张量默认输入参数中的requires_gard设置成True,就看进行自动求导了。下面举个例子,简单看一下具体流程:

- 第一种情况,当我们的输出时一个标量时
import torch

x = torch.ones(1, 3, requires_grad=True)  # 为了方便手动计算,我们使用单位矩阵
a = x + 2
z = 3 * a.pow(2)

print('x的值', x)
print('a的值', a)
print('z的值', z)

out = torch.mean(z)  # 此处的out是一个标量,由x的大小可以看出,求均值的分母为x的个数
out.backward()
print(x.grad)

#结果显示
x的值 tensor([[1., 1., 1.]], requires_grad=True)
a的值 tensor([[3., 3., 3.]], grad_fn=<AddBackward0>)
z的值 tensor([[27., 27., 27.]], grad_fn=<MulBackward0>)
tensor([[6., 6., 6.]])
上面代码中out被我们定义为:

所以求导很容易看出:

- 第二种情况,当我们的输出是一个向量时
import torch
import copy

x = torch.ones(1, 3, requires_grad=True)  # 为了方便手动计算,我们使用单位矩阵
a = x + 2
z = 3 * a.pow(2)

print('x的值', x)
print('a的值', a)
print('z的值', z)

gradients1 = torch.tensor([[0.1, 1, 0.01]], dtype=torch.float)  # 要注意的是这里的参数要与out的维度保持一致
z.backward(gradients1, True)  # 此处是为了保证最后输出的行数,以此类推,几个gradients就是几行
A_temp = copy.deepcopy(x.grad)
x.grad.zero_()

gradients2 = torch.tensor([[1, 1, 1]], dtype=torch.float)
z.backward(gradients2)
B_temp = x.grad
print(torch.cat((A_temp, B_temp), 0))

#结果显示
x的值 tensor([[1., 1., 1.]], requires_grad=True)
a的值 tensor([[3., 3., 3.]], grad_fn=<AddBackward0>)
z的值 tensor([[27., 27., 27.]], grad_fn=<MulBackward0>)
tensor([[ 1.8000, 18.0000,  0.1800],
      [18.0000, 18.0000, 18.0000]])
这里我们传入的参数看成行向量,与对应的雅可比矩阵1进行线性操作。
- 第三种情况,当我们输出为一个矩阵时
import torch

x = torch.ones(2, 3, requires_grad=True)  # 为了方便手动计算,我们使用单位矩阵
a = x + 2
z = 3 * a.pow(2)

print('x的值', x)
print('a的值', a)
print('z的值', z)

gradients = torch.tensor([[1, 1, 1], [0, 1, 2]], dtype=torch.float)
z.backward(gradients)
print(x.grad)

#结果显示
x的值 tensor([[1., 1., 1.],
      [1., 1., 1.]], requires_grad=True)
a的值 tensor([[3., 3., 3.],
      [3., 3., 3.]], grad_fn=<AddBackward0>)
z的值 tensor([[27., 27., 27.],
      [27., 27., 27.]], grad_fn=<MulBackward0>)
tensor([[18., 18., 18.],
      [ 0., 18., 36.]])
# 【----------------------------】
# PyTorch学习(2)
这里是根据莫凡pytorch学习的,与pytorch学习(1)可能有所重叠,但是大部分不太一样,可以结合着一起看
# 1 Numpy与Torch的区别与联系
# 1.1 numpy的array与Torch的tensor转换
1)数据类型转换
注:torch只处理二维数据
import torch
import numpy as np

np_data = np.arange(6).reshape((2, 3))
torch_data = torch.from_numpy(np_data)
tensor2array = torch_data.numpy()

print('\nnp_data', np_data,
     '\ntorch_data', torch_data,
     '\ntensor2array', tensor2array, )

#结果显示
np_data [[0 1 2]
[3 4 5]]
torch_data tensor([[0, 1, 2],
      [3, 4, 5]], dtype=torch.int32)
tensor2array [[0 1 2]
[3 4 5]]
2)矩阵乘法
data = [[1, 2], [2, 3]]
tensor = torch.FloatTensor(data)
print('\nnumpy', np.matmul(data, data),
     '\ntorch', torch.matmul(tensor, tensor))

#结果显示
numpy [[ 5  8]
[ 8 13]]
torch tensor([[ 5.,  8.],
      [ 8., 13.]])
注意的是torch中默认的tensor是float形式的
# 1.2 Torch中的variable
import torch
from torch.autograd import Variable

tensor = torch.FloatTensor([[1, 2], [3, 4]])
variable = Variable(tensor, requires_grad=True)

t_out = torch.mean(tensor*tensor)
v_out = torch.mean(variable*variable)
print('tensor', tensor)
print('variable', variable)
print('t_out', t_out)
print('v_out', v_out)

v_out.backward()  # 反向传播
print('grad', variable.grad)  # variable的梯度
print(variable.data.numpy())

#结果显示
tensor tensor([[1., 2.],
      [3., 4.]])
variable tensor([[1., 2.],
      [3., 4.]], requires_grad=True)
t_out tensor(7.5000)
v_out tensor(7.5000, grad_fn=<MeanBackward0>)
grad tensor([[0.5000, 1.0000],
      [1.5000, 2.0000]])
[[1. 2.]
[3. 4.]]
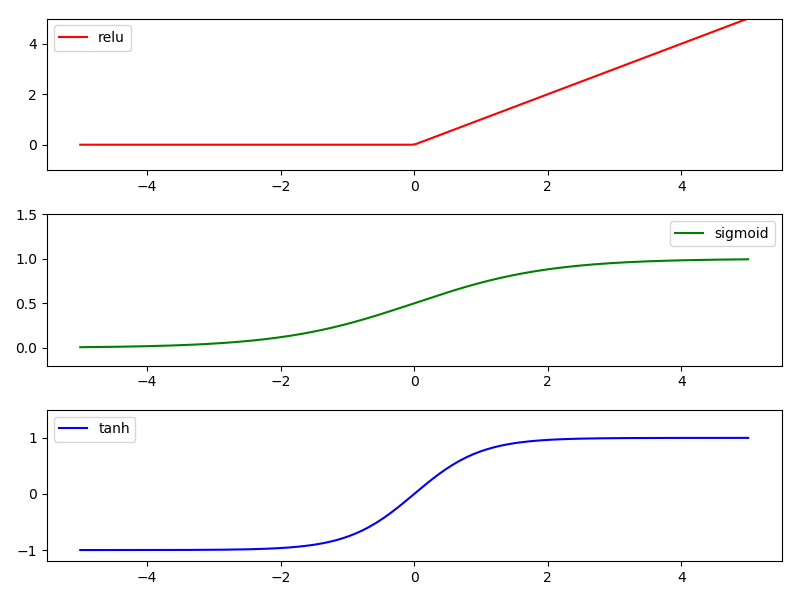
# 2 激励函数(Activation Function)
对于多层神经网络,激励函数的选择有一定窍门
推荐网络与激活函数的对应:
- CNN-relu
- RNN-relu/tanh
有三种常用激活函数:(这里说的是线图)
relu、sigmoid、tanh
import torch
from torch.autograd import Variable
import matplotlib.pyplot as plt

x = torch.linspace(-5, 5, 200)  # 从-5~5分成200段
x = Variable(x)
x_np = x.data.numpy()

y_relu = torch.relu(x).data.numpy()
y_sigmoid = torch.sigmoid(x).data.numpy()
y_tanh = torch.tanh(x).data.numpy()

plt.figure(1, figsize=(8, 6))
plt.subplot(311)
plt.plot(x_np, y_relu, c='r', label='relu')
plt.ylim((-1, 5))
plt.legend(loc='best')

plt.subplot(312)
plt.plot(x_np, y_sigmoid, c='g', label='sigmoid')
plt.ylim((-0.2, 1.5))
plt.legend(loc='best')

plt.subplot(313)
plt.plot(x_np, y_tanh, c='b', label='tanh')
plt.ylim((-1.2, 1.5))
plt.legend(loc='best')
plt.show()

#结果显示
# 3 Regression回归(关系拟合回归)
一般分为两种:
- 回归问题:一堆数据出一条线
- 分类问题:一堆数据进行分类
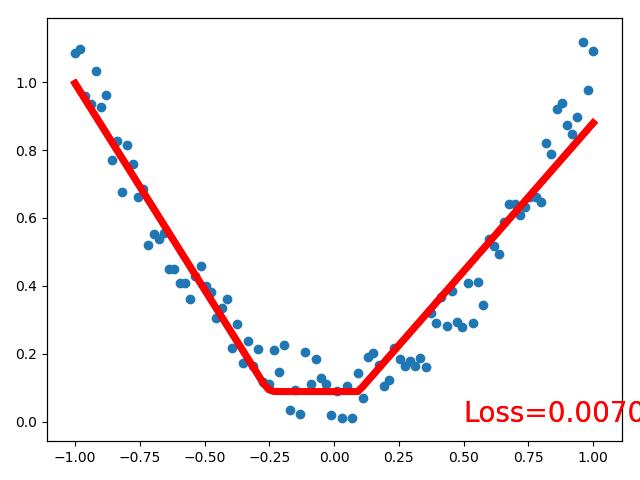
我们讲的是回归问题:
import torch
from torch.autograd import Variable
import matplotlib.pyplot as plt

x = torch.unsqueeze(torch.linspace(-1, 1, 100), dim=1)  # 一维变二维
y = x.pow(2) + 0.2*torch.rand(x.size())

x, y = Variable(x), Variable(y)

# plt.scatter(x.data.numpy(), y.data.numpy())
# plt.show()

# 搭建网络
class Net(torch.nn.Module):
   def __init__(self, n_features, n_hidden , n_output):
       super(Net, self).__init__()
       # 以上为固定的初始化
       self.hidden = torch.nn.Linear(n_features, n_hidden)
       self.predict = torch.nn.Linear(n_hidden, n_output)

   def forward(self, x):
       x = torch.relu(self.hidden(x))
       x = self.predict(x)
       return x

net = Net(1, 10, 1)  # 1个输入点,10个隐藏层的节点,1个输出
print(net)

plt.ion()  # 可视化
plt.show()

optimizer = torch.optim.SGD(net.parameters(), lr=0.5)
loss_function = torch.nn.MSELoss()  # 回归问题用均方误差,分类问题用其他的误差损失函数

for t in range(100):
   out = net(x)
   loss = loss_function(out, y)  # 预测值在前真实值在后
   optimizer.zero_grad()
   loss.backward()
   optimizer.step()
   if t % 5 == 0:
       plt.cla()
       plt.scatter(x.data.numpy(), y.data.numpy())
       plt.plot(x.data.numpy(), out.data.numpy(), 'r-', lw=5)
       plt.text(0.5, 0, 'Loss=%.4f' % loss.item(), fontdict={'size': 20, 'color': 'red'})
       plt.pause(0.1)

plt.ioff()
plt.show()

#结果显示
Net(
(hidden): Linear(in_features=1, out_features=10, bias=True)
(predict): Linear(in_features=10, out_features=1, bias=True)
)
最终输出的结果图:
# 4 Classification(分类)
import torch
from torch.autograd import Variable
import matplotlib.pyplot as plt

n_data = torch.ones(100, 2)
x0 = torch.normal(2*n_data, 1)
y0 = torch.zeros(100)
x1 = torch.normal(-2*n_data, 1)
y1 = torch.ones(100)
x = torch.cat((x0, x1), 0).type(torch.FloatTensor)
y = torch.cat((y0, y1), ).type(torch.LongTensor)

x, y = Variable(x), Variable(y)

# plt.scatter(x.data.numpy(), y.data.numpy())
# plt.show()

# 搭建网络
class Net(torch.nn.Module):
   def __init__(self, n_features, n_hidden , n_output):
       super(Net, self).__init__()
       # 以上为固定的初始化
       self.hidden = torch.nn.Linear(n_features, n_hidden)
       self.predict = torch.nn.Linear(n_hidden, n_output)

   def forward(self, x):
       x = torch.relu(self.hidden(x))
       x = self.predict(x)
       return x

net = Net(2, 10, 2)  # 2个输入点,10个隐藏层的节点,2个输出
print(net)

plt.ion()  # 可视化
plt.show()

optimizer = torch.optim.SGD(net.parameters(), lr=0.2)
loss_function = torch.nn.CrossEntropyLoss()

for t in range(10):  # 训练的步数
   out = net(x)
   loss = loss_function(out, y)  # 预测值在前真实值在后
   optimizer.zero_grad()
   loss.backward()
   optimizer.step()
   if t % 2 == 0:
       plt.cla()
       out = torch.softmax(out, 1)
       prediction = torch.max(out, 1)[1]  # 如果索引为1则为最大值所在位置,如果为0,则为最大值本身
       pred_y = prediction.data.numpy().squeeze()
       target_y = y.data.numpy()
       plt.scatter(x.data.numpy()[:, 0], x.data.numpy()[:, 1], c=pred_y, s=100)
       accuracy = sum(pred_y == target_y) / 200
       plt.text(1.5, -4, 'Accuracy=%.4f' % accuracy, fontdict={'size': 20, 'color': 'red'})
       plt.pause(0.1)

plt.ioff()
plt.show()

#结果显示
# 5 Torch网络
# 5.1 快速搭建torch网络
# 搭建网络
class Net(torch.nn.Module):
   def __init__(self, n_features, n_hidden , n_output):
       super(Net, self).__init__()
       # 以上为固定的初始化
       self.hidden = torch.nn.Linear(n_features, n_hidden)
       self.predict = torch.nn.Linear(n_hidden, n_output)

   def forward(self, x):
       x = torch.relu(self.hidden(x))
       x = self.predict(x)
       return x

net1 = Net(2, 10, 2)  # 2个输入点,10个隐藏层的节点,2个输出
print(net1)

net2 = torch.nn.Sequential(
   torch.nn.Linear(2, 10),
   torch.nn.ReLU(),
   torch.nn.Linear(10, 2),
)
print(net2)
这里的net1与net2其实是一样的,其中多数用第二种方式进行模型搭建,net2与tensorflow中的搭建方式一样。
# 5.2 保存和提取网络与参数
import torch
from torch.autograd import Variable
import matplotlib.pyplot as plt

torch.manual_seed(1)

x = torch.unsqueeze(torch.linspace(-1, 1, 100), dim=1)  # 一维变二维
y = x.pow(2) + 0.2*torch.rand(x.size())

x, y = Variable(x, requires_grad=False), Variable(y, requires_grad=False)  # 当requires_grade为False时,不用求梯度

def save():
   net1 = torch.nn.Sequential(
       torch.nn.Linear(1, 10),
       torch.nn.ReLU(),
       torch.nn.Linear(10, 1),
  )
   optimizer = torch.optim.SGD(net1.parameters(), lr=0.05)
   loss_function = torch.nn.MSELoss()

   for t in range(1000):  # 训练的步数
       prediction = net1(x)
       loss = loss_function(prediction, y)  # 预测值在前真实值在后
       optimizer.zero_grad()
       loss.backward()
       optimizer.step()

   torch.save(net1, 'net.pkl')  # 保存模型
   torch.save(net1.state_dict(), 'net_params.pkl')  # 保存所有节点

   plt.figure(1, figsize=(10, 3))
   plt.subplot(131)
   plt.title('Net1')
   plt.scatter(x.data.numpy(), y.data.numpy())
   plt.plot(x.data.numpy(), prediction.data.numpy(), 'r-', lw=5)

def restore_net():
   net2 = torch.load('net.pkl')
   prediction = net2(x)
   plt.subplot(132)
   plt.title('Net2')
   plt.scatter(x.data.numpy(), y.data.numpy())
   plt.plot(x.data.numpy(), prediction.data.numpy(), 'r-', lw=5)

def restore_params():
   net3 = torch.nn.Sequential(
       torch.nn.Linear(1, 10),
       torch.nn.ReLU(),
       torch.nn.Linear(10, 1),
  )
   net3.load_state_dict(torch.load('net_params.pkl'))
   prediction = net3(x)
   plt.subplot(133)
   plt.title('Net3')
   plt.scatter(x.data.numpy(), y.data.numpy())
   plt.plot(x.data.numpy(), prediction.data.numpy(), 'r-', lw=5)
   plt.show()

save()
restore_net()
restore_params()

#结果显示

# 5.3 批处理
import torch
import torch.utils.data as Data

BATCH_SIZE = 5  # 一小批5个训练

x = torch.linspace(1, 10, 10)
y = torch.linspace(10, 1, 10)

torch_dataset = Data.TensorDataset(x, y)
loader = Data.DataLoader(
   dataset=torch_dataset,
   batch_size=BATCH_SIZE,
   shuffle=True,
   num_workers=2,
)  # shuffle就是定义是否打乱数据顺序, num_workers就是用几个线程进行提取

def show_batch():
   for epoch in range(3):  # 总体训练三次
       for step, (batch_x, batch_y) in enumerate(loader):
           print('Epoch: ', epoch, '| Step: ', step, '| batch x: ', batch_x.numpy(), '| batch y: ', batch_y.numpy())

if __name__ == '__main__':
   show_batch()

#结果显示
Epoch:  0 | Step:  0 | batch x: [10.  1.  2.  9.  4.] | batch y: [ 1. 10.  9.  2.  7.]
Epoch:  0 | Step:  1 | batch x: [5. 7. 6. 3. 8.] | batch y: [6. 4. 5. 8. 3.]
Epoch:  1 | Step:  0 | batch x: [3. 1. 2. 7. 5.] | batch y: [ 8. 10.  9.  4.  6.]
Epoch:  1 | Step:  1 | batch x: [10.  4.  9.  8.  6.] | batch y: [1. 7. 2. 3. 5.]
Epoch:  2 | Step:  0 | batch x: [10.  7.  1.  5.  4.] | batch y: [ 1.  4. 10.  6.  7.]
Epoch:  2 | Step:  1 | batch x: [9. 3. 8. 6. 2.] | batch y: [2. 8. 3. 5. 9.]
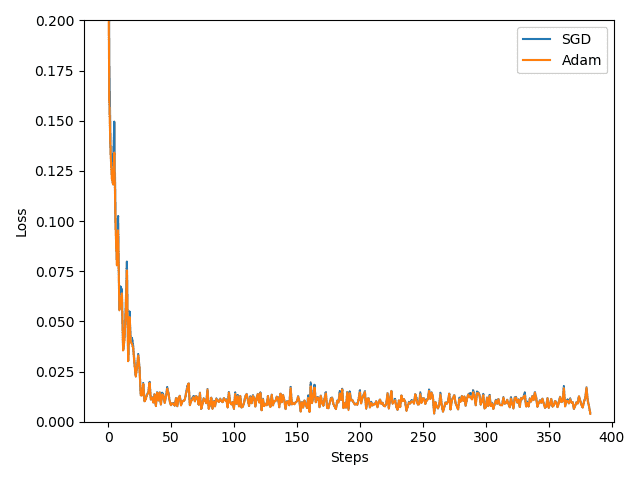
# 5.3 优化器optimizer加速神经网络
所有的优化器都是更新我们神经网络的参数,例传统更新方法:
Adam方法
m为下坡属性,v为阻力属性
import torch
import torch.utils.data as Data
# from torch.autograd import Variable
import matplotlib.pyplot as plt

LR = 0.02
BATH_SIZE = 32
EPOCH = 12

x = torch.unsqueeze(torch.linspace(-1, 1, 1000), dim=1)
y = x.pow(2) + 0.1*torch.normal(torch.zeros(*x.size()))

# plt.scatter(x.numpy(), y.numpy())
# plt.show()

torch_dataset = Data.TensorDataset(x, y)
loader = Data.DataLoader(dataset=torch_dataset, batch_size=BATH_SIZE, shuffle=True, num_workers=2)

# class Net(torch.nn.Module):
#     def __init__(self, n_features=1, n_hidden=20 , n_output=1):
#         super(Net, self).__init__()
#         # 以上为固定的初始化
#         self.hidden = torch.nn.Linear(n_features, n_hidden)
#         self.predict = torch.nn.Linear(n_hidden, n_output)
#
#     def forward(self, x):
#         x = torch.relu(self.hidden(x))
#         x = self.predict(x)
#         return x
net = torch.nn.Sequential(
   torch.nn.Linear(1, 20),
   torch.nn.ReLU(),
   torch.nn.Linear(20, 1)
)

net_SGD = net
# net_Momentum = net
# net_RMSprop = net
net_Adam = net
nets = [net_SGD, net_Adam]

opt_SGD = torch.optim.SGD(net_SGD.parameters(), lr=LR)
# opt_Momentum = torch.optim.SGD(net_Momentum.parameters(), lr=LR, momentum=0.7)
# opt_RMSprop = torch.optim.RMSprop(net_RMSprop.parameters(), lr=LR, alpha=0.9)
opt_Adam = torch.optim.Adam(net_Adam.parameters(), lr=LR, betas=(0.9, 0.99))
optimizers = [opt_SGD, opt_Adam]

loss_func = torch.nn.MSELoss()
losses_his = [[], []]

def show_batch():
   for epoch in range(EPOCH):
       print(epoch)
       for step, (batch_x, batch_y) in enumerate(loader):
           # b_x = Variable(batch_x)
           # b_y = Variable(batch_y)
           for net, opt, l_his in zip(nets, optimizers, losses_his):
               output = net(batch_x)
               loss = loss_func(output, batch_y)
               opt.zero_grad()
               loss.backward()
               opt.step()
               l_his.append(loss.item())
               # print('1111', l_his)

   labels = ['SGD', 'Adam']
   for i, l_his in enumerate(losses_his):
       plt.plot(l_his, label=labels[i])
   plt.legend(loc='best')
   plt.xlabel('Steps')
   plt.ylabel('Loss')
   plt.ylim((0, 0.2))
   plt.show()

if __name__ == '__main__':
   show_batch()
#结果显示
# 6 神经网络分类
- CNN 卷积神经网络
import torch
import torch.nn as nn
import torch.utils.data as Data
import torchvision
import matplotlib.pyplot as plt

EPOCH = 1
BATCH_SIZE = 50
LR = 0.001
DOWNLOAD_MNIST = True

train_data = torchvision.datasets.MNIST(
   root='./mnist',
   train=True,
   transform=torchvision.transforms.ToTensor(),  # 将三维数据压缩成二维的(0, 1)
   download=DOWNLOAD_MNIST
)
# print(train_data.data.size())
# print(train_data.targets.size())
# plt.imshow(train_data.data[0].numpy(), cmap='gray')
# plt.title('%i' % train_data.targets[0])
# plt.show()

train_loader = Data.DataLoader(dataset=train_data, batch_size=BATCH_SIZE, shuffle=True, num_workers=2)

test_data = torchvision.datasets.MNIST(root='./mnist/', train=False)
test_x = torch.unsqueeze(test_data.data, dim=1).type(torch.FloatTensor)[:2000]/255.
test_y = test_data.targets[:2000]

class CNN(nn.Module):
   def __init__(self):
       super(CNN, self).__init__()
       self.conv1 = nn.Sequential(
           nn.Conv2d(
               in_channels=1,
               out_channels=16,
               kernel_size=5,
               stride=1,
               padding=2,  # padding=(kernel_size-1)/2
          ),
           nn.ReLU(),
           nn.MaxPool2d(kernel_size=2,),
      )
       self.conv2 = nn.Sequential(
           nn.Conv2d(16, 32, 5, 1, 2),
           nn.ReLU(),
           nn.MaxPool2d(2)
      )
       self.out = nn.Linear(32 * 7 * 7, 10)

   def forward(self, x):
       x = self.conv1(x)
       x = self.conv2(x)
       x = x.view(x.size(0), -1)  # 这里的size就是conv2的输出,-1就是展平
       output = self.out(x)
       return output

cnn = CNN()

optimizer = torch.optim.Adam(cnn.parameters(), lr=LR)
loss_func = nn.CrossEntropyLoss()

def show_batch():
   for epoch in range(EPOCH):
       print(epoch)
       for step, (batch_x, batch_y) in enumerate(train_loader):
           # b_x = Variable(batch_x)
           # b_y = Variable(batch_y)
           output = cnn(batch_x)
           loss = loss_func(output, batch_y)
           optimizer.zero_grad()
           loss.backward()
           optimizer.step()

           if step % 50 == 0:
               test_output = cnn(test_x)
               pred_y = torch.max(test_output, 1)[1].data.squeeze()
               accuracy = sum(pred_y == test_y) / float(test_y.size(0))
               print('Epoch: ', epoch, '| train loss: %.4f' % loss.item(), '| test accuracy: %2f' % accuracy)
   test_output = cnn(test_x[:10])
   pred_y = torch.max(test_output, 1)[1].data.numpy().squeeze()
   print(pred_y, 'prediction number')
   print(test_y[:10].numpy(), 'real number')

if __name__ == '__main__':
   show_batch()

#结果显示
0
Epoch:  0 | train loss: 2.2959 | test accuracy: 0.107000
……
Epoch:  0 | train loss: 0.0895 | test accuracy: 0.981500
[7 2 1 0 4 1 4 9 5 9] prediction number
[7 2 1 0 4 1 4 9 5 9] real number

Process finished with exit code 0
- RNN 循环神经网络(一般用在时间顺序上)
- LSTM 长短时记忆网络(RNN的一种,就是加了输入输出与中断三个门控单元)
# 分类
import torch
from torch import nn
import torchvision.datasets as dsets
import torchvision.transforms as transforms
import matplotlib.pyplot as plt
import torch.utils.data as Data

EPOCH = 1
BATCH_SIZE = 64
TIME_STEP = 28
INPUT_SIZE = 28
LR = 0.01
DOWNLOAD_MNIST = False  # 如果下载了mnist数据集则为false,没有则设置为true

train_data = dsets.MNIST(root='./mnist', train=True, transform=transforms.ToTensor(), download=DOWNLOAD_MNIST)
train_loader = Data.DataLoader(dataset=train_data, batch_size=BATCH_SIZE, shuffle=True, num_workers=2)

test_data = dsets.MNIST(root='./mnist/', train=False)
test_x = test_data.data.type(torch.FloatTensor)[:2000]/255.
test_y = test_data.targets.numpy().squeeze()[:2000]

class RNN(nn.Module):
   def __init__(self):
       super(RNN, self).__init__()

       self.rnn = nn.LSTM(
           input_size=INPUT_SIZE,
           hidden_size=64,
           num_layers=1,  # hidden层数
           batch_first=True,  # (batch, time_step, input)默认形式
      )
       self.out = nn.Linear(64, 10)

   def forward(self, x):
       r_out, (h_n, h_c) = self.rnn(x, None)  # h_n与h_c表示分线程与主线程的隐藏层,None表示第一个隐藏层是否有
       out = self.out(r_out[:, -1, :])
       return out

rnn = RNN()
print(rnn)

# 训练
optimizer = torch.optim.Adam(rnn.parameters(), lr=LR)
loss_func = nn.CrossEntropyLoss()

def show_batch():
   for epoch in range(EPOCH):
       for step, (x, y) in enumerate(train_loader):
           output = rnn(x.view(-1, 28, 28))
           loss = loss_func(output, y)
           optimizer.zero_grad()  # 清零
           loss.backward()
           optimizer.step()  # 优化器优化

           if step % 50 == 0:
               test_output = rnn(test_x)
               pred_y = torch.max(test_output, 1)[1].data.numpy().squeeze()
               accuracy = sum(pred_y == test_y) / test_y.size
               print('Epoch: ', epoch, '| train loss: %.4f' % loss.item(), '| test accuracy: %2f' % accuracy)

   test_output = rnn(test_x[:10].view(-1, 28, 28))
   pred_y = torch.max(test_output, 1)[1].data.numpy().squeeze()
   print(pred_y, 'prediction number')
   print(test_y[:10], 'real number')

if __name__ == '__main__':
   show_batch()

#结果显示
Epoch:  0 | train loss: 2.2838 | test accuracy: 0.089500
Epoch:  0 | train loss: 0.9505 | test accuracy: 0.600500
……
Epoch:  0 | train loss: 0.1406 | test accuracy: 0.946000
[7 2 1 0 4 1 4 9 5 9] prediction number
[7 2 1 0 4 1 4 9 5 9] real number
# 回归
import torch
from torch import nn
import numpy as np
import matplotlib.pyplot as plt
import torch.utils.data as Data

torch.manual_seed(1)  # 设置一个种子,让每个训练的网络初始化相同

TIME_STEP = 10
INPUT_SIZE = 1
LR = 0.02

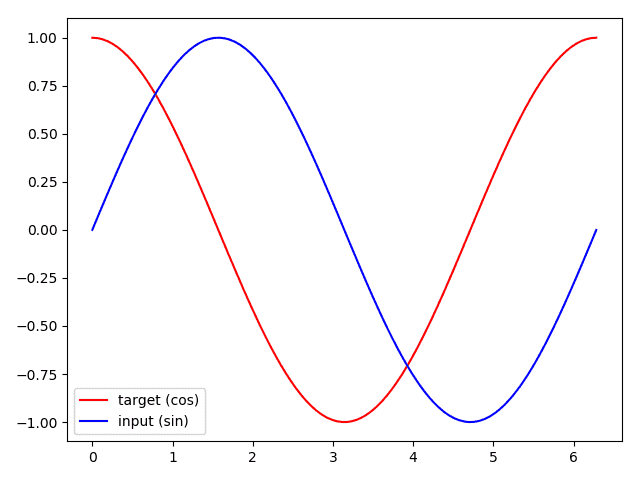
# steps = np.linspace(0, np.pi*2, 100, dtype=np.float32)
# x_np = np.sin(steps)
# y_np = np.cos(steps)
# plt.plot(steps, y_np, 'r-', label='target (cos)')
# plt.plot(steps, x_np, 'b-', label='input (sin)')
# plt.legend(loc='best')
# plt.show()

class RNN(nn.Module):
   def __init__(self):
       super(RNN, self).__init__()

       self.rnn = nn.RNN(
           input_size=INPUT_SIZE,
           hidden_size=32,
           num_layers=1,  # hidden层数
           batch_first=True,  # (batch, time_step, input)默认形式
      )
       self.out = nn.Linear(32, 1)

   def forward(self, x, h_state):
       r_out, h_state = self.rnn(x, h_state)  # x包含很多步的,h_state只包含一步
       outs = []
       for time_step in range(r_out.size(1)):
           outs.append(self.out(r_out[:, time_step, :]))
       return torch.stack(outs, dim=1), h_state  #

rnn = RNN()
print(rnn)

# 训练
optimizer = torch.optim.Adam(rnn.parameters(), lr=LR)
loss_func = nn.MSELoss()

plt.figure(1, figsize=(12, 5))
plt.ion()

h_state = None
for step in range(60):
   start, end = step * np.pi, (step + 1) * np.pi
   steps = np.linspace(start, end, TIME_STEP, dtype=np.float32)
   x_np = np.sin(steps)
   y_np = np.cos(steps)
   x = torch.from_numpy(x_np[np.newaxis, :, np.newaxis])
   y = torch.from_numpy(y_np[np.newaxis, :, np.newaxis])

   prediction, h_state = rnn(x, h_state)
   h_state = h_state.data  #
   loss = loss_func(prediction, y)
   optimizer.zero_grad()
   loss.backward()
   optimizer.step()

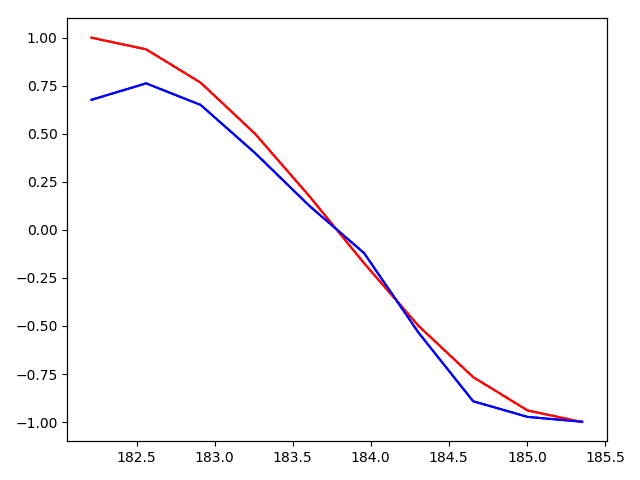
   plt.plot(steps, y_np.flatten(), 'r-')
   plt.plot(steps, prediction.data.numpy().flatten(), 'b-')
   plt.draw()
   plt.pause(0.05)

plt.ioff()
plt.show()

#结果显示
# 【----------------------------】
# PyTorch学习-总结篇(3)——最实用部分
一、每个项目代码应该有五个部分(大同小异)
二、以一个项目示例来进行讲解(MNIST手写数据集)
1.导包及定义超参数(这步往往是最后才能完成的,因为只有写完了下面,才能知道你要定义什么及用什么包)
2.数据集读入
3.模型的搭建
4.损失函数、优化器、可视化及继续训练
5.模型的训练
经过(1)和(2)的学习,相信对基础知识有一定的了解,其实如果想快速进行代码书写与项目调试及运行,仅看(3)应该可以让你快速掌握项目的编写规则
# 一、每个项目代码应该有五个部分(大同小异)
- 首先,一个项目的代码应该是导包及定义我们的超参数
- 然后,将本次项目所需数据集读入,一般包括训练集和测试集两个部分
- 其次,开始搭建我们的网络模型主体框架
- 再然后,是进行模型的损失函数、优化器及可视化操作
- 最后,是进行我们模型的训练及测试
# 二、以一个项目示例来进行讲解(MNIST手写数据集)
# 1.导包及定义超参数(这步往往是最后才能完成的,因为只有写完了下面,才能知道你要定义什么及用什么包)
# -*- coding: utf-8 -*-
# -代码界的小菜鸟-

import os
import torch
import torch.untils.data as Data
import torch.nn as nn
import torch.nn.functional as F
import torch.optim as optim
from tensorboardX import SummaryWriter
from torchvision import datasets,transforms

batch_size = 64
epochs = 10
checkpoints_dir = './checkpoints'
event_dir = './event_file'
model_name = None  # 如果需要加载模型继续训练,则’/10.pth‘
lr = 1e-4

#检测GPU是否可以使用
print('GPU是否可用:', torch.cuda.is_available())  # 可用为True
device = torch.device('cuda' if torch.cuda.is_available() else 'cpu')
# 2.数据集读入
# 实例化数据集Dataset
train_dataset = datasets.MNIST(root='./dataset/', train=True, download=True,transform=transforms.Compose([transforms.ToTensor(), transforms.Normalize((0.1307,), (0.3081,))]))
test_dataset = datasets.MNIST(root='./dataset/', train=False, transform=transforms.Compose([transforms.ToTensor(), transforms.Normalize((0.1307,), (0.3081,))]))

# 数据加载器
train_loader = Data.DataLoader(train_dataset, batch_size=batch_size, shuffle=True)  # shuffle是否随机打乱顺序
test_loader = Data.DataLoader(test_dataset, batch_size=batch_size, shuffle=True)

# 保存检查点的地址
if not os.path.exists(checkpoints_dir):
    os.makedirs(checkpoints_dir)
# 3.模型的搭建
# 模型搭建(pytorch框架定义的的神经网络模型都需要继承nn.Module类)
class Net(nn.Module):

   # 初始化函数,定义了该神经网络的基本结构
   def __init__(self):
       super(Net, self).__init__()  # 复制并使用Net的父类的初始化方法,即先运行nn.Module的初始化函数
       self.conv1 = nn.Conv2d(in_channels=1, out_channels=20, kernel_size=5, stride=1)  # 输入为图像(1),即灰度图,输出为20张特征图,卷积和为5*5的正方形
       self.conv2 = nn.Conv2d(in_channels=20, out_channels=20, kernel_size=5, stride=1)
       self.fc1 = nn.Linear(in_features=4*4*20, out_features=300)  # 定义全连接线性函数:y=Wx+b,并将4*4*20个节点连接到300个节点上
       self.fc2 = nn.Linear(in_features=300, out_features=10)

   # 定义神经网络的前向传播函数
   def forward(self, x):
       x = F.relu(self.conv1(x))  # 输入x经过卷积conv1后,再经过一个激活函数更新x
       x = F.max_pool2d(x, kernel_size=2, stride=2)  # 经过激活函数后,使用2*2的窗口进行最大池化,更新x
       x = F.relu(self.conv2(x))
       x = F.max_pool2d(x, 2, 2)
       x = x.view(-1, 4 * 4 * 20)  # 利用view函数将张量x变成一维向量的形式,总特征个数不变
       x = F.relu(self.fc1(x))  # 更新后的x经过全连接函数,再经过激活函数,更新x
       x = self.fc2(x)
       return x

# 模型实例化
model = Net().to(device)
# 4.损失函数、优化器、可视化及继续训练
# 定义损失函数
criterion = nn.CrossEntropyLoss()  # 交叉熵损失函数

# 定义优化器
optimzer = optim.SGD(model.parameters(), lr=lr)

# 可视化处理
writer = SummaryWriter(event_dir)

# 继续训练
start_epoch = 0
if model_name:
    print('加载模型:',checkpoints_dir + model_name)
    checkpoint = torch.load(checkpoints_dir + model_name)
    model.load_state_dict(checkpoint['model_state_dict'])
    optimzer.load_state_dict(checkpoint['optimizer_state_dict'])
    start_epoch = checkpoint['epoch']
# 5.模型的训练
# 开始训练
for epoch in range(start_epoch, epochs):
    model.train()  # 模型训练的标志
    for batch_idx, (data, target) in enumerate(train_loader):
        data = data.to(device)  # 训练数据,放到GPU上
        target = target.to(device)  # 训练标签,放到GPU上

        # 前向传播
        output = model(data)
        loss = criterion(output, target)  # 计算损失函数

        # 反向传播
        optimzer.zero_grad()  # 首先进行梯度清零
        loss.backward()  # 反向传播
        optimzer.step()  # 更新参数

    print('Train Epoch: {} \tLoss:{{:,6f}}'.format(epoch+1, loss.item()))

    # 可视化
    writer.add_scalar(tag='train_loss', scalar_value=loss.item(), global_step=epoch + 1)
    writer.flush()


    model.eval()  # 模型测试的标志
    test_loss = 0
    correct = 0

    with torch.no_grad():
        for data, target in test_loader:
            data, target = data.to(device), target.to(device)

            output = model(data)
            pred = output.argmax(dim=1, keepdim=True)  # 获取最大的对数概率的索引
            correct += pred.eq(target.view_as(pred)).sum().item()
            test_loss += criterion(output, target).item()

    test_loss /= len(test_loader.dataset)
    print('测试集:损失:{:.4f},精度:{:.2f}%'.format(test_loss, 100. * correct / len(test_loader.dataset)))

    # 可视化
    writer.add_scalar(tag='val_loss', scalar_value=test_loss, global_step=epoch + 1)
    writer.flush()


    # 保存模型
    if (epoch + 1) % 10 ==0:
        checkpoint = {'model_state_dict':model.state_dict(), 'optimizer_state_dict': optimzer.state_dict(), 'epoch': epoch + 1}
        torch.save(checkpoint, '%s/%d.pth' % (checkpoints_dir, epochs))

#结果显示
GPU是否可用: True
Train Epoch: 1  Loss:2.264611
测试集:损失:0.0358,精度:20.98%
Train Epoch: 2  Loss:2.253827
测试集:损失:0.0354,精度:28.34%
Train Epoch: 3  Loss:2.217229
测试集:损失:0.0349,精度:39.88%
Train Epoch: 4  Loss:2.233548
测试集:损失:0.0343,精度:50.97%
Train Epoch: 5  Loss:2.144451
测试集:损失:0.0335,精度:58.34%
Train Epoch: 6  Loss:2.111312
测试集:损失:0.0325,精度:64.29%
Train Epoch: 7  Loss:1.988998
测试集:损失:0.0310,精度:68.26%
Train Epoch: 8  Loss:1.837759
测试集:损失:0.0290,精度:71.13%
Train Epoch: 9  Loss:1.635040
测试集:损失:0.0264,精度:72.52%
Train Epoch: 10     Loss:1.344689
测试集:损失:0.0232,精度:75.39%
可视化步骤:
1.打开event_file文件夹,在当前文件夹打开cmd,然后输入tensorboard --logdir "./",就可以看到:

2.打开浏览器在 浏览器中输入https://localhost:6006/ 即可显示 :
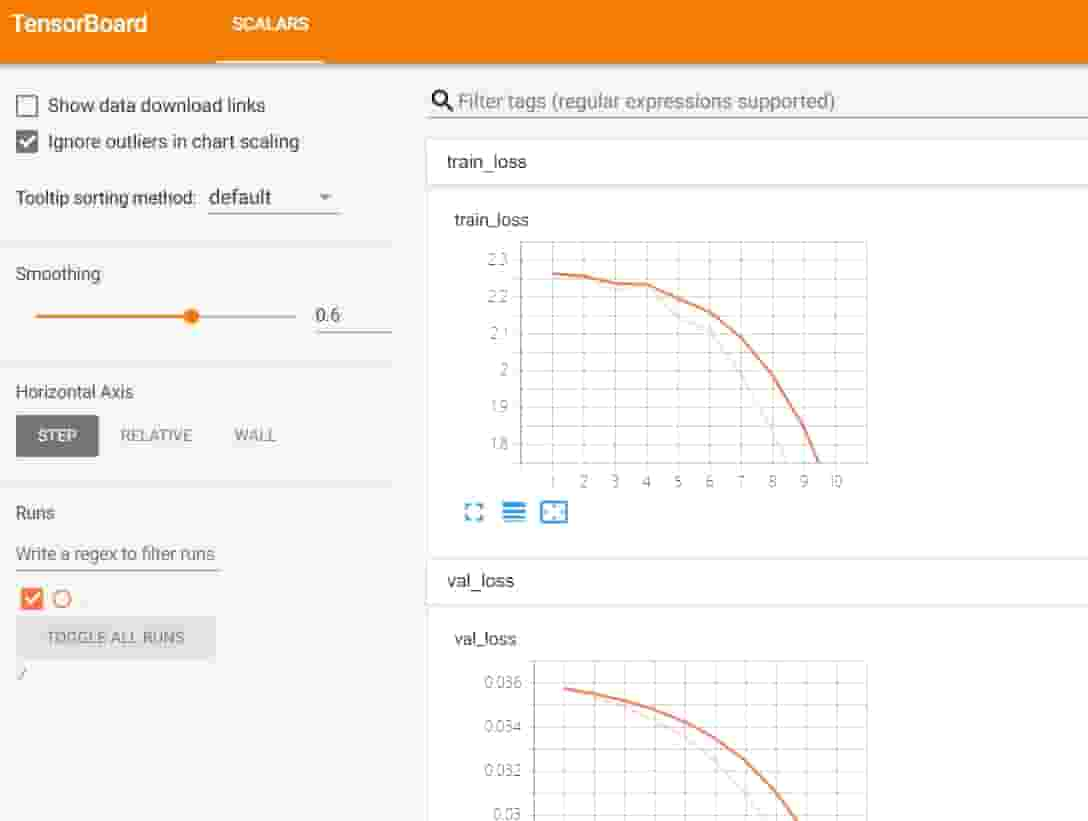
torch.utils.data
# 参考文章
- https://www.cnblogs.com/minyuan/p/13958475.html#autoid-1-0-0
- https://www.cnblogs.com/minyuan/p/13960119.html
- https://www.cnblogs.com/minyuan/p/13969547.html


